🔒 Comprehensive Guide to File Anonymization
Welcome to the professional documentation for securely anonymizing sensitive data using our platform. This guide will walk you through the entire process, from file upload to applying anonymization configurations and saving your anonymized files.
Step 1: Select New FileSafe Run
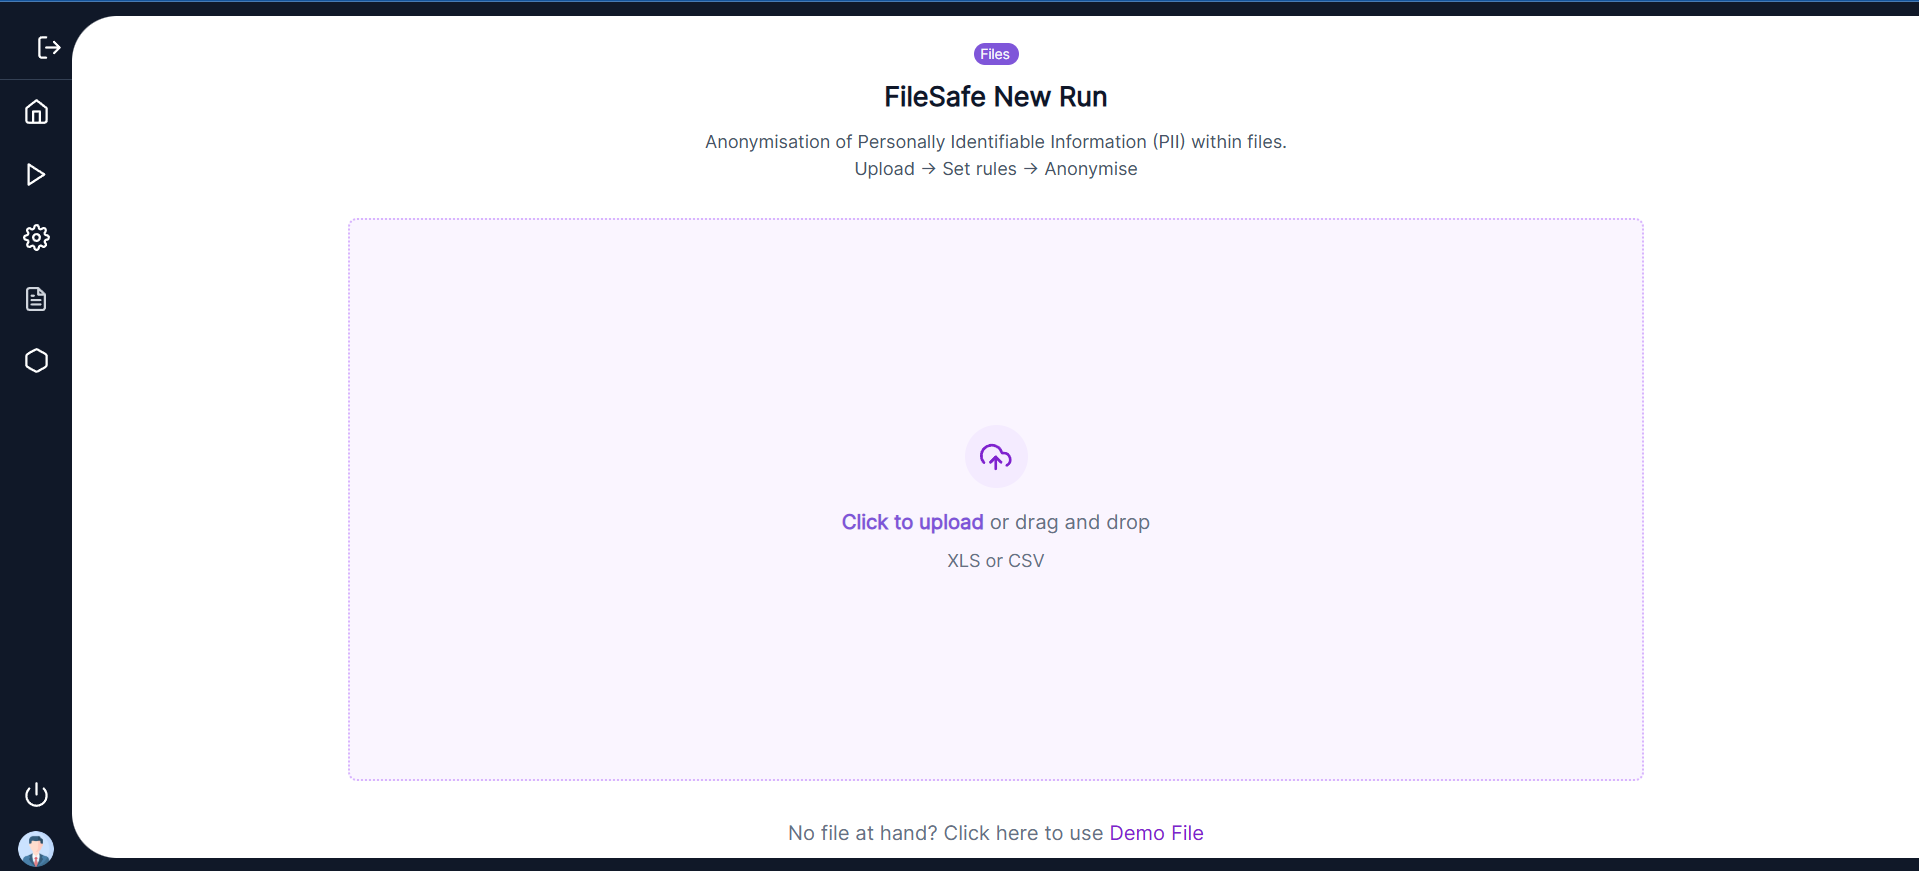 To begin, select a new FileSafe run from the sidebar. This will initiate the anonymization process.
- Click to Upload or Drag and Drop a file to initiate the process of anonymization.
- On clicking Click to Upload, select the file from your local device that you wish to anonymize.
- Alternatively, you can use one of the available Demo Files to explore and understand the process.
📤 Step 2: Upload Your File
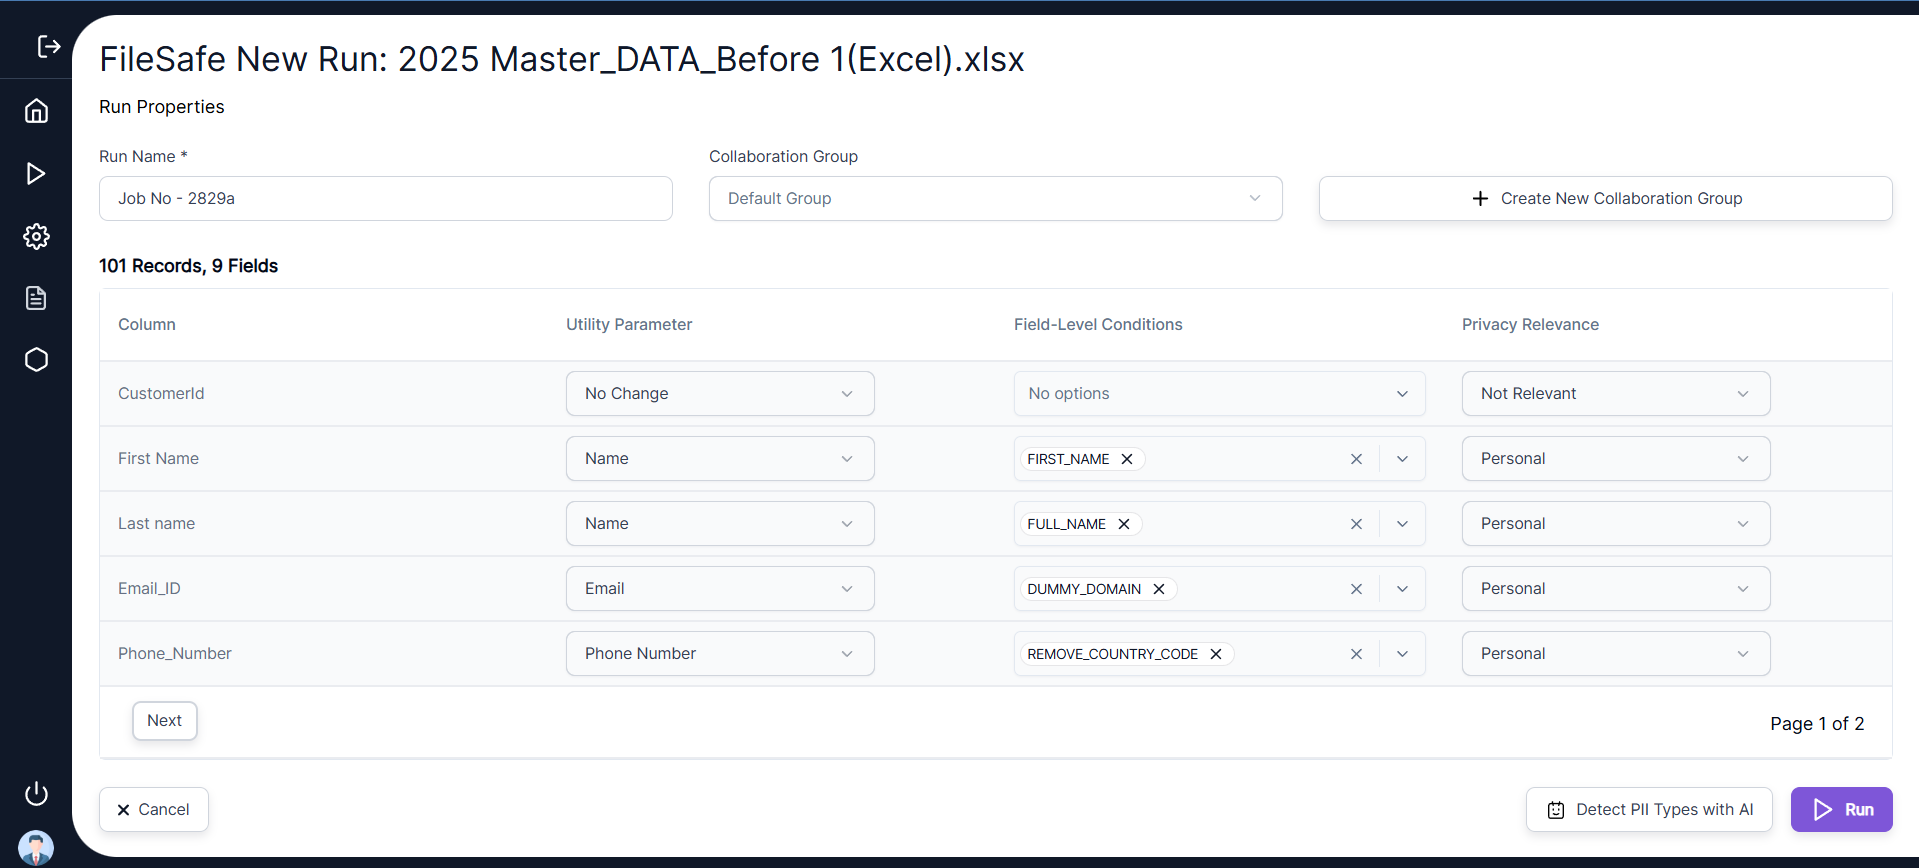
- Users will be directed to the next screen after the file upload is complete.
- On this screen, "Column" represents the header of the uploaded
.xlsor.csvfile. - For example, if the uploaded file contains 5 columns, the table will display 5 rows, each representing a column header.
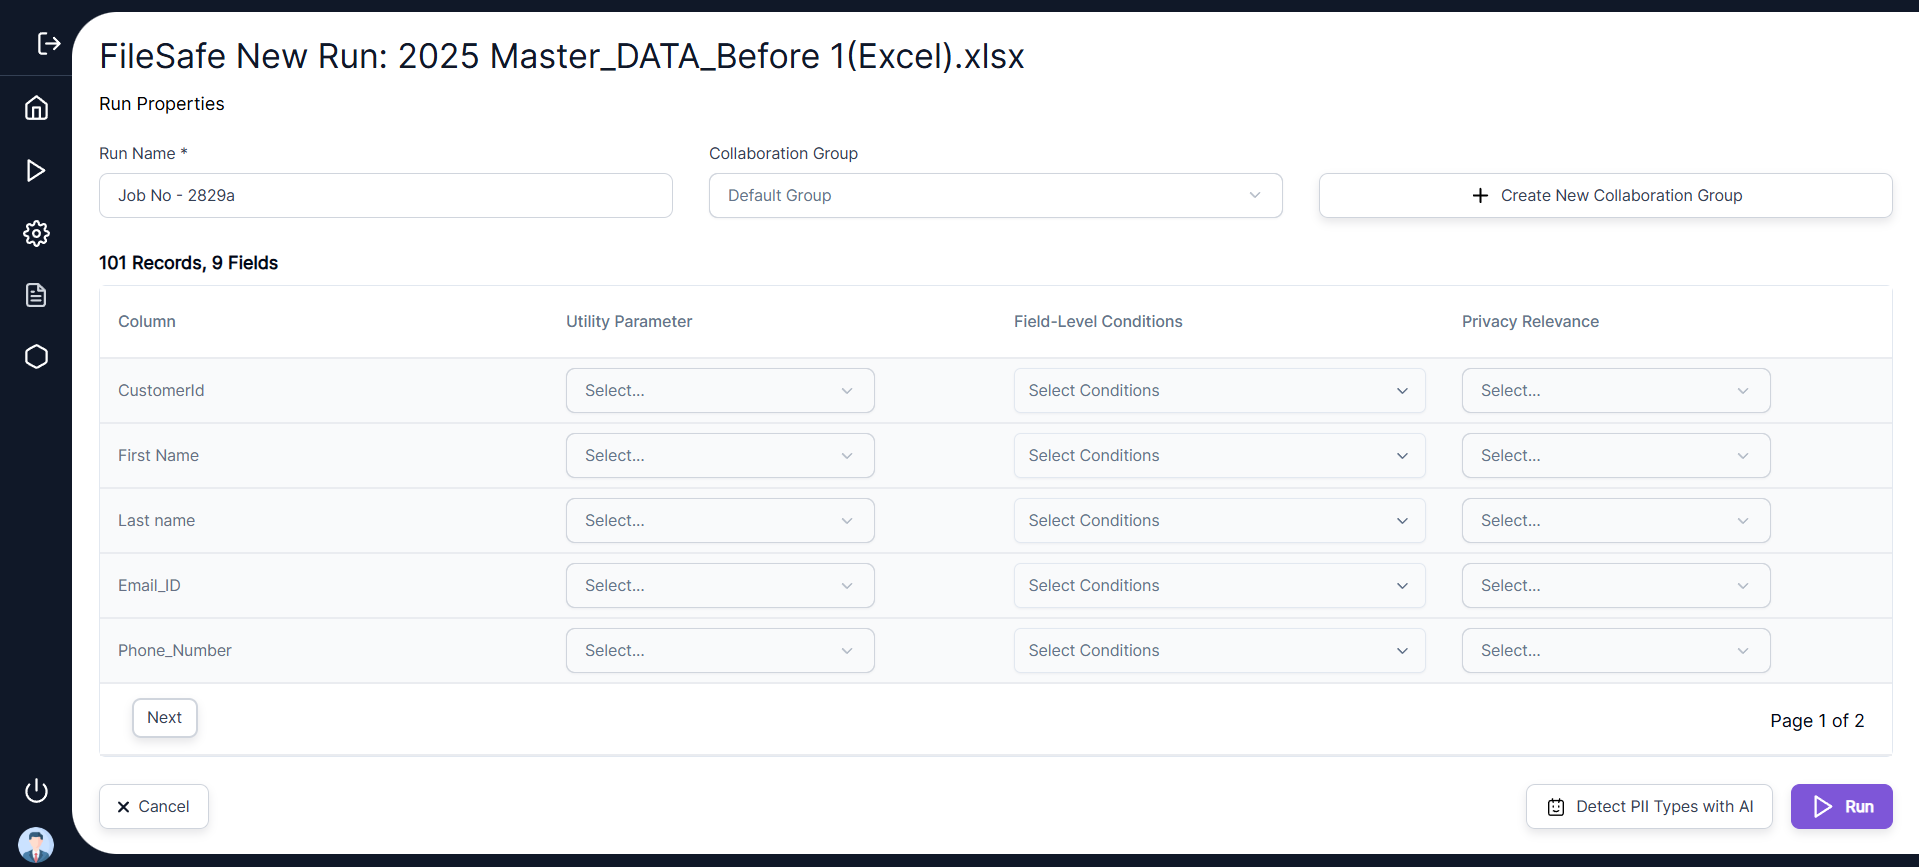
📝 Note: The first row of your file will be treated as the header, and the platform will use it as field names for the anonymization process. Ensure your headers are accurate.
🔍 Step 3: Derive PII
- Use the Detect PII Types function to automatically identify fields containing Personally Identifiable Information (PII) or sensitive data.
- This step will Categorize Personal Information within your uploaded file using AI Leverage.
- The categorization allows users to apply appropriate anonymization rules based on the detected data types.
To initiate the detection process:
- Click on the Detect PII Types with AI button to start the identification and categorization.
Post Detection Results:
- Once the PII detection is completed successfully, the Utility Parameter column will be populated with the detected PII categories such as:
NamePhone NumberEmailDate
- If no PII data is detected in a column, the value "No Change" will be assigned to that column.
Privacy Relevance Assignment:
- The system also assigns a Privacy Relevance tag to each column, which can be:
PersonalConfidentialNot Relevant

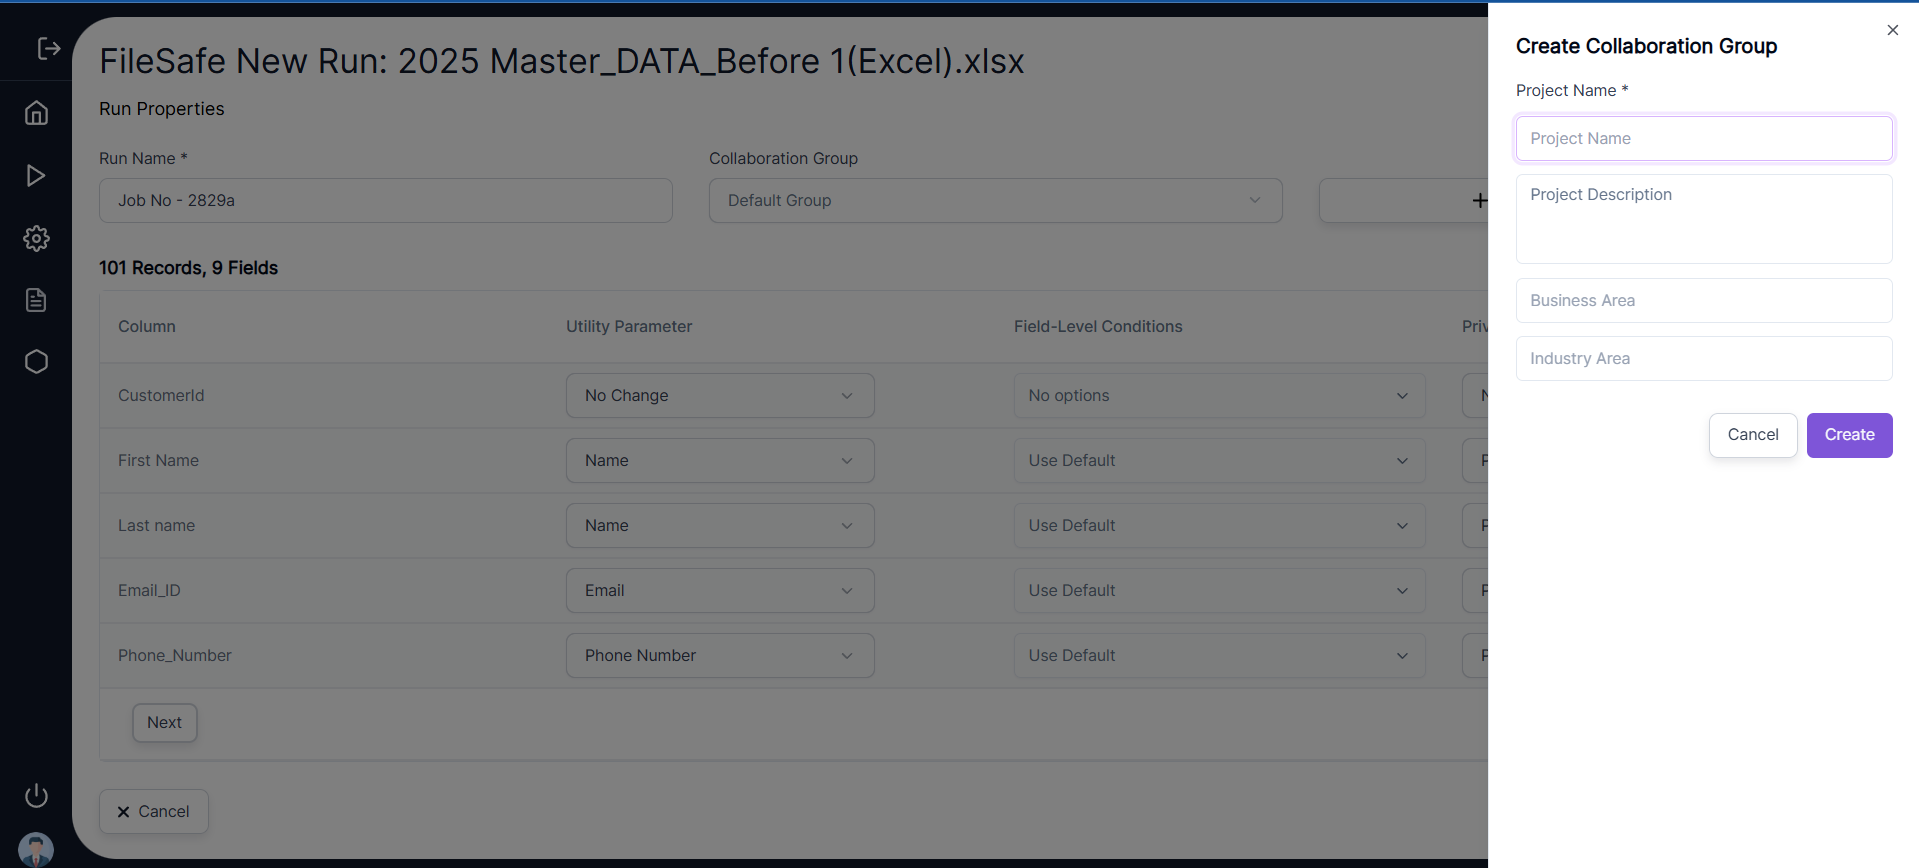
Step 4: Select Collaboration Group or Create a New One
- Collaboration Groups help maintain consistency across different datasets to ensure uniform anonymization across projects.
- Users can either select an existing collaboration group or create a new one to anonymize the file consistently.
- If no collaboration group is selected, a Default Group will be automatically assigned.
To select or create a Collaboration Group:
- Select an existing collaboration group from the drop-down menu under Run Properties.
- Click Create New Collaboration Group to create a new group.
- While creating a new collaboration group, the user must enter the mandatory parameter: Project Name.
🛠️ Step 5: Configure Utility Parameters and Conditions
After uploading your file, it’s time to configure utility parameters and their corresponding conditions for each data field.This signifies how the data in the file needs to be anonymized.
- If the user does not select any Utility Conditions, a Use Default Utility Condition is automatically assigned.
- The default values for Utility Parameters are as follows:
- Email →
DUMMY_DOMAIN - Name →
FULL_NAME - Date →
Consistent - Phone Number →
RANDOM
- Email →
Customizing Utility Parameters and Utility Conditions:
- Users can customize anonymization rules by modifying the Utility Parameter and Utility Conditions for each column.
- The details of available Utility Parameters and Utility Conditions are provided in the reference section (not shown here).
Example:
- In the example File Safe Run:
- The Utility Parameter for the column Customer ID has been changed to
Consistent IDinstead ofNo Change. - The Utility Conditions have been changed to:
LAST_NAMEfor column #1KEEP DOMAINfor column #5
- The Utility Parameter for the column Customer ID has been changed to
Privacy Relevance:
- Users also have the option to manually change the Privacy Relevance of any column as per their specific requirements.
Utility Parameters and Conditions Table
| Utility Parameter | Conditions | Description |
|---|---|---|
| No Change | N/A | Leaves the data unchanged. |
| Clear Values | N/A | Clears or wipes out the data in the selected fields. |
| Dummy Domain, Keep Domain, All Caps | Anonymizes email addresses with additional formatting options. | |
| Name | First Name, Last Name, All Caps, Full Name, Name | Handles name fields with specific conditions for first name, last name, etc. |
| Consistent ID | N/A | Generates a consistent identifier for tracking across records. |
| Fixed Value | Text Field for user to enter a Fixed Value | Replaces the field with the fixed value entered by the user in the text field. |
| Date | Same Year, Random, Adult, Consistent | Anonymizes date fields while retaining some options for consistency. |
| Phone Number | REMOVE_COUNTRY_CODE, RANDOM, CONSISTENT | Add the two conditions |
| Number | N/A | Randomizes or anonymizes numerical data. |
| Custom Expressions | N/A | For File Safe this is not a supported feature. Therefore, remove it from the table. |
| Org Name | Company Name, Bank Name, Remove Org Suffix , All Caps | Anonymizes Organization Name to either Company Name or Bank Name based on the utility condition selected. Maintains consistency during the anonymisation. |
| Material Name | Fixed Mat, Random Mat, All Caps | Anonymizes the Material Name different formats based on the selected condition. |
| IBAN | N/A | Anonymizes the IBAN to an IBAN of the same country while retaining the length and the pattern. |
| Account Number | N/A | Anonymizes the Account Number using format preserving encryption. Retaining the length and numeric pattern. |
| Address | House Number, Street, City, Post Code | Anonymizes the address to either a House Number, Street, City or Post Code based on the condition selected. |
| IP Address | Consistent | Anonymizes the IP Address to a consistent IPv4 format |
| URL | Domain/Sub Domain/URL | Anonymizes the selected URL to a consistent format based on the condition selected. |
| Passport | N/A | Anonymizes the Passport Number to an anonymized Passport number retaining the original length, character types and delimiters. It will retain the first “N”chars of the passport where “N” will be customizable number. |
| SSN ID | N/A | Anonymizes the National Identification Numbers to an anonymized number retaining the original format length, character types and delimiters. It will retain the first “N”chars of the original ID where “N” will be customizable number. |
| Tax ID | N/A | Anonymizes the Tax ID to an anonymized Tax ID retaining the original length, character types and delimiters. It will retain the first “N”chars of the Tax ID, where “N” will be customizable number. |
Condition-Specific Details:
-
Email Conditions:
- Dummy Domain: Replaces the email domain (e.g.,
example.com). - Keep Domain: Retains the original domain while anonymizing the rest of the email.
- All Caps: Anonymizes the complete email and converts the entire email to uppercase.
- Dummy Domain: Replaces the email domain (e.g.,
-
Name Conditions:
- First Name: Anonymizes only the first name field.
- Last Name: Anonymizes only the last name field.
- All Caps: Anonymizes the name and converts the name to uppercase
- Full Name: Anonymizes the entire full name as a single unit.
-
Date Conditions:
- Same Year: Keeps the year consistent across all records.
- Random: Randomizes the entire date.
- Adult: Ensures the date reflects an adult age.
- Consistent: Keeps the date consistent across records.
-
Phone Conditions:
- Remove_Country_Code: Removes the country code but generates a consistent anonymized value for the remaining phone number.
- Random: Anonymizes the complete phone number.
- Consistent: Randomizes the first occurrence of a phone number and then maintains consistency for the rest.
- Remove Country Code: Removes the first 4 digits from the original phone number and generates a consistent anonymized value for the remaining number.
-
Org Name Conditions:
- The default condition (if user doesn’t select any value) for an Org Name will be always Company Name.
- Bank Name: Replaces the Organization Name with an anonymized Bank Name. Also maintains consistency during the anonymisation process.
- Company Name: Replaces the Organization Name with an anonymized Company Name. Also maintaining consistency during the anonymisation process will, however, retain any suffix of the company name at the end.
- Remove Org Prefix: Anonymizes the Organization Name to a Company Name and removes the Suffix. The list of identified suffixes by the application is listed below. Users will not be allowed to select a Bank Name and a Remove Org Prefix combination.
- All Caps: Anonymizes the Org Name to Company Name and capitalizes it.
-
Material Name Conditions:
-
The default condition (if user doesn’t select any value) for a Material Name will be always RANDOM_MAT.
-
RANDOM_MAT: Replaces the Material Name with a
MATERIAL_SEQUENCE_NO. Also maintains consistency across the data. Example: “Inflammable Liquid” →MATERIAL_1 -
FIXED_MAT: Replaces the Material Name with an anonymized material name. Also maintains consistency across the data. Example: “Inflammable Liquid” →
RUBBER_1 -
All Caps: Anonymizes the Material Name using the selected method and capitalizes it.
-
-
Address Conditions:
-
House_Number: The address will be anonymized to a random house number.
-
Street: The address will be anonymized to a random postcode.
-
City: The address will be anonymized to a random city.
-
Post Code: The address will be anonymized to a random postcode.
The anonymized postcode will retain the length and the format of the original postcode.
Examples:12345→ anonymized to a 5-digit numeric postcode12345-6789→ anonymized to a ZIP+4-digit formatA12 B345→ anonymized to a 7-character alphanumeric format (retains pattern)
-
-
URL Conditions:
-
Subdomain: Only the subdomain part of the URL will be anonymized and replaced.
The type will not be retained.
Example: a numeric value can be replaced with an alphabet and vice versa. -
Domain: Only the domain part of the URL will be anonymized.
The type will not be retained.
Example: a numeric value can be replaced with an alphabet and vice versa. -
URL: Both the domain and subdomain part of the URL will be anonymized and replaced.
-
💾 Step 6: Run the File Anonymization
- Once the Utility Parameters and Utility Conditions have been configured, proceed to run the anonymization process.
- Click on Run to execute the File Safe Run.
Post-Submission:
- After clicking Run, the user will be redirected to the File Safe Tab on the Jobs Page.
- On the Jobs Page, users can track the status and progress of the anonymization job.
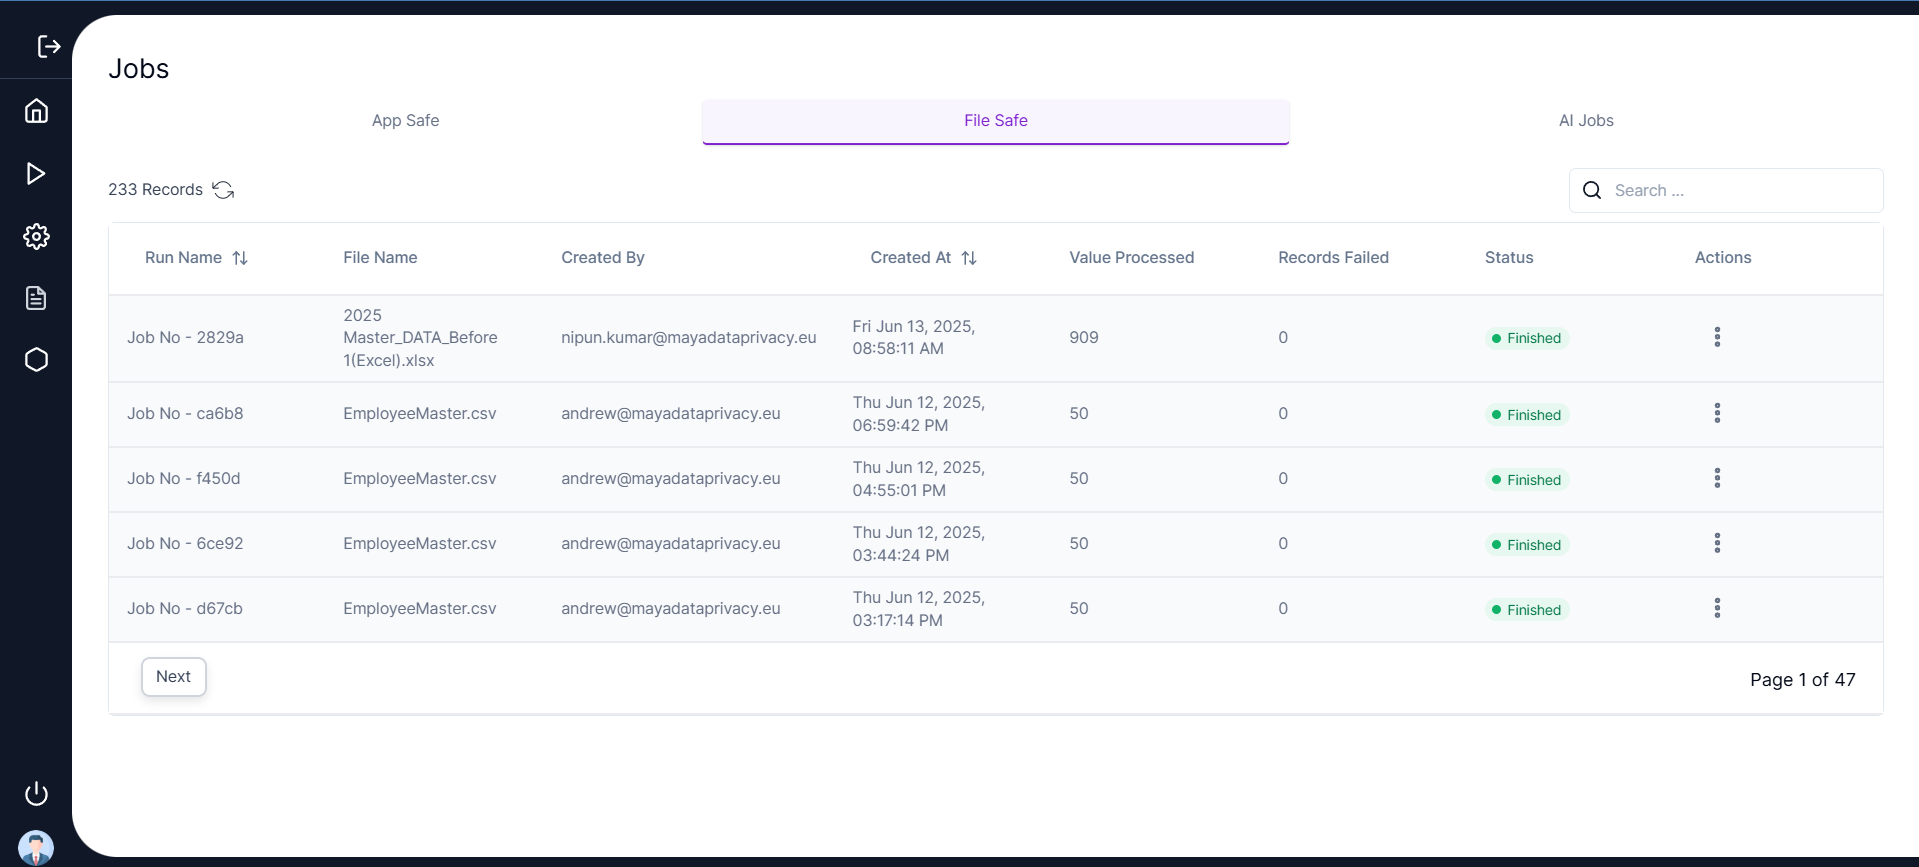
🔄 Step 7: Monitor Job Status
Navigate to the Jobs Pag by clicking History on the left navigation panel. User can check the progress of the file safe anonymization job:
- Use the Refresh button in the top right corner to view the updated status.
- The job status can be:
Not StartedIn ProgressFinishedFailed
- Users can also view:
- Values Processed — the number of successfully anonymized records.
- Records Failed — the number of failed records.
- Once the File Anonymization is in the Finished state, click on the Download icon under the Actions column to download the anonymized file.
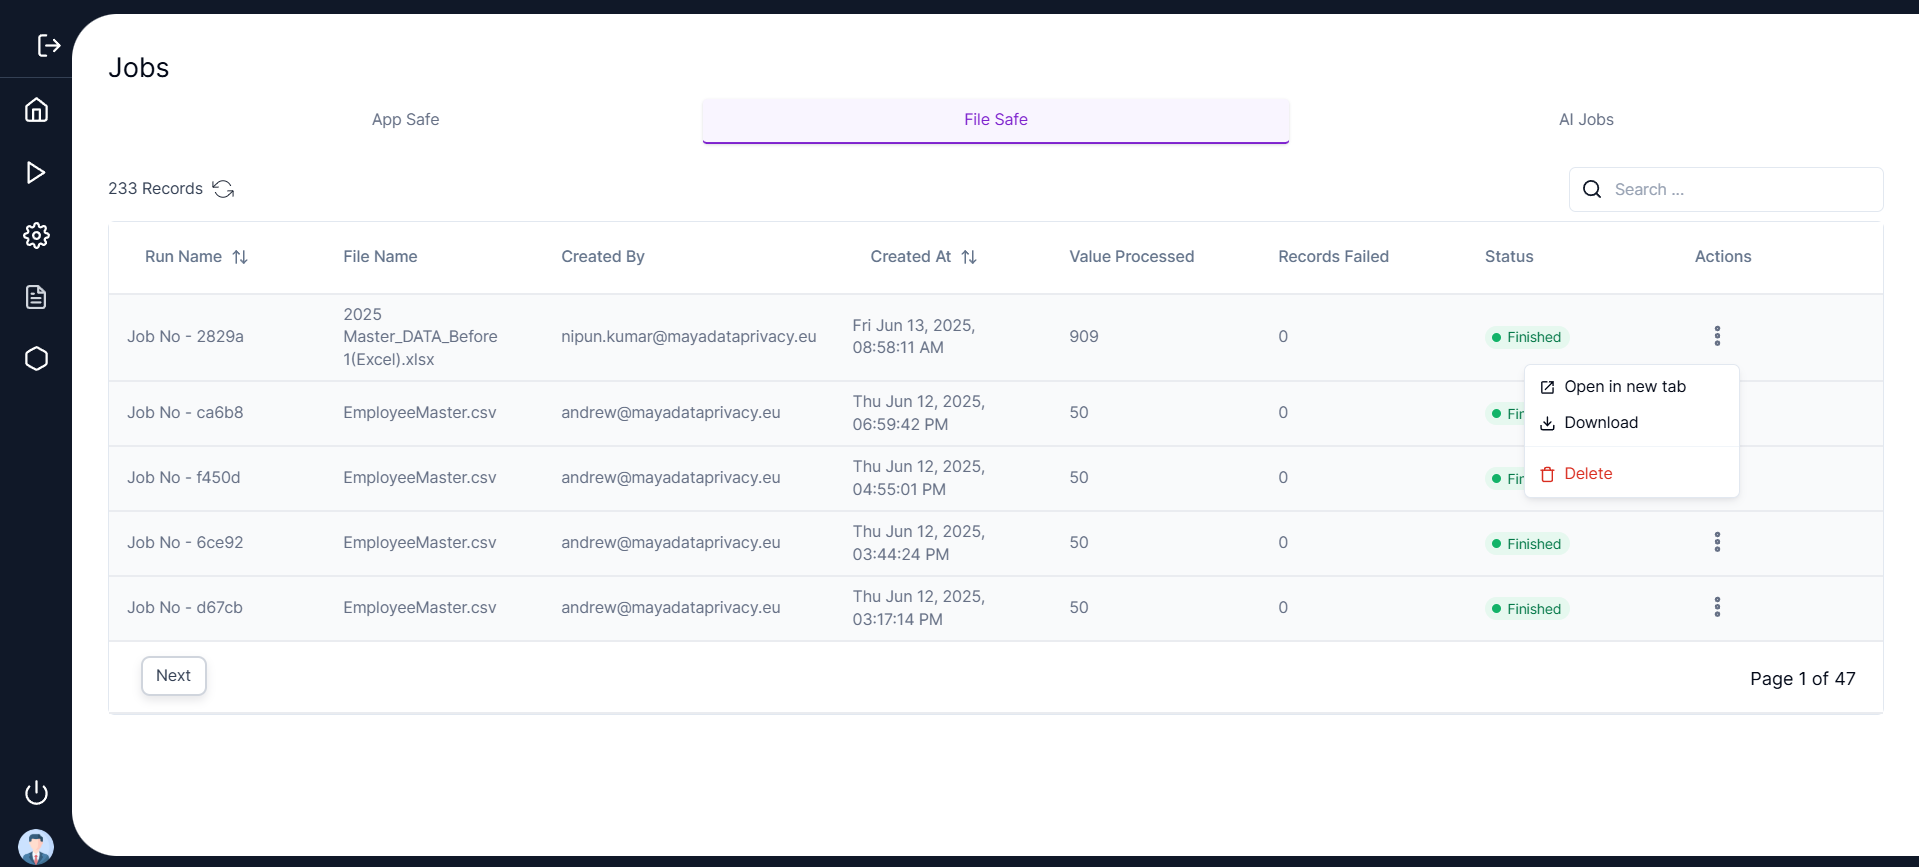
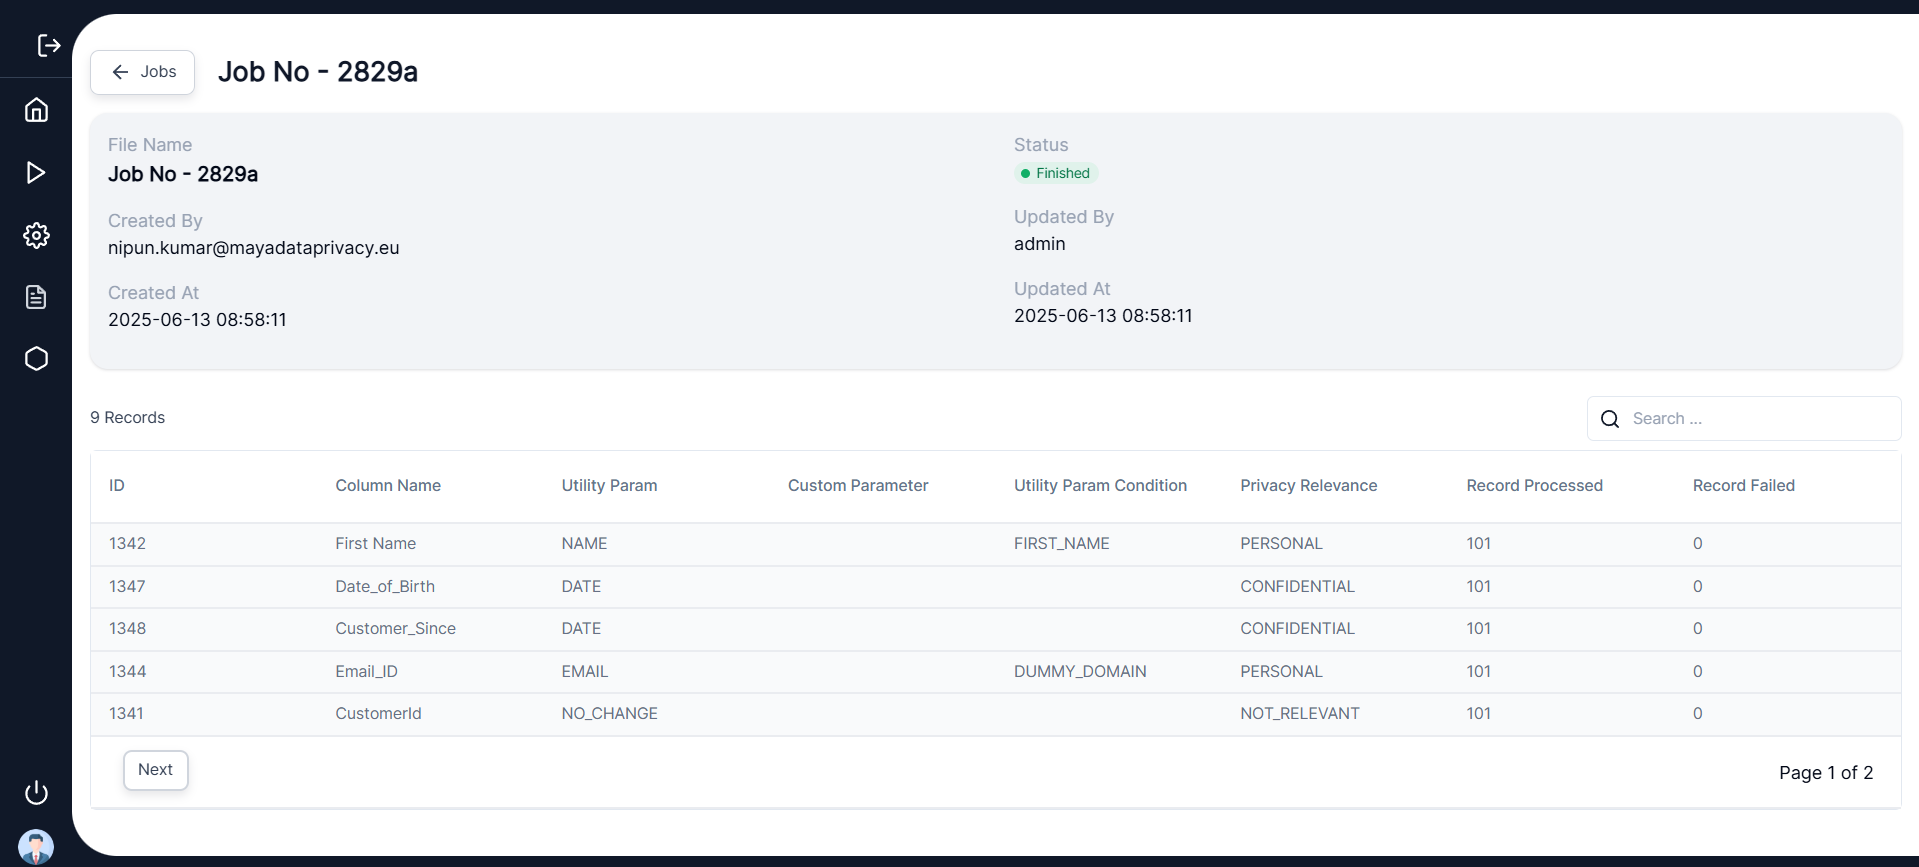
- Click on the corresponding Run Name in the Jobs Page to view the detailed history of the File Safe Job.
- The detailed history shows:
- Utility Parameters
- Utility Conditions
- Privacy Relevance
🎯 Conclusion
By following these steps, you can securely anonymize your data with ease. If you encounter any difficulties, our support team is always available to assist.